導入 SDK
使用Android Studio集成SDK
添加文件
- 1.把sdk中的
google-services.json放置到遊戲主工程的跟目錄下。如下圖所示: 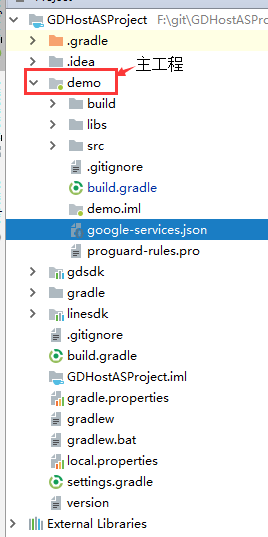
- 2.把sdk中gdconfig.xml文件放置到遊戲主工程的res/values目錄下。gdconfig.xml所配置內容解析可參見遊戲相關信息配置。
step1 添加google服務
- 1,啟用Java 1.8支持
xml
android {
...
  compileOptions {
        sourceCompatibility JavaVersion.VERSION_1_8
        targetCompatibility JavaVersion.VERSION_1_8
    }
...
}- 2,導入開啟google服務
- 在根級build.gradle導入google服務
xml
buildscript {
    ...
    dependencies {
		classpath 'com.google.gms:google-services:4.4.4'
    }
	...
}- 3,在遊戲主項目build.gradle文件的最底部開啟google服務
xml
apply plugin: 'com.google.gms.google-services'step2 添加GDSDK依賴庫
- 1,在settings.gradle導入GDSDK倉庫
xml
pluginManagement {
    repositories {
		...
		// 导入GDSDK仓库
        maven{
            url "https://repo.gdsre.cn/bale/repo"
        }
    }
}

dependencyResolutionManagement {
    repositories {
		...
		// 导入GDSDK仓库
        maven{
            url "https://repo.gdsre.cn/bale/repo"
        }
    }

}- 2,添加GDSDK依賴庫(此步需要提供出口IP,我方Android對接技術配置白名單)獲取IP地址:https://www.ip125.com/
- 在遊戲主項目build.gradle文件中添加依賴庫:
xml
dependencies {
	...
	// 此處為實例,具體依賴地址請查看交付SDK的readme文件
    implementation 'com.gd:gdsdk-xxx:x.x.x'
	...
}
*如接收到“403”code,代表沒在白名單。
step3 停用配置APK的語言選項
在遊戲主項目build.gradle使用android.bundle塊,添加language.enableSplit=false,讓配置APK時不對語言文件區分分發:
xml
android {
    bundle {
        language {
            enableSplit = false
        }
        density {
            ...
        }
        abi {
           ...
        }
    }
}