Import SDK
Integrate the SDK with Android Studio
Add Files
- Place
google-services.jsonfrom the SDK in the root directory of the game's main project, as shown below:
- Place
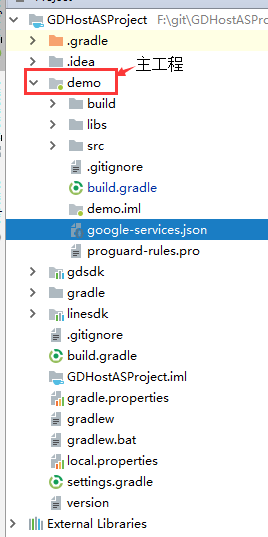
- Place the gdconfig.xml file from the SDK in the game's main project's res/values directory. For details about the gdconfig.xml configuration, see Configure Game Related Information.
step1 Add Google Services
- Enable Java 1.8 support
xml
android {
...
  compileOptions {
        sourceCompatibility JavaVersion.VERSION_1_8
        targetCompatibility JavaVersion.VERSION_1_8
    }
...
}- Import and enable Google Services
- Import Google Services in the root-level build.gradle file
xml
buildscript {
    ...
    dependencies {
		classpath 'com.google.gms:google-services:4.4.4'
    }
	...
}- Enable Google Services at the bottom of the game's main project build.gradle file
xml
apply plugin: 'com.google.gms.google-services'step2 Add GDSDK Dependencies
- Import the GDSDK repository in settings.gradle
xml
pluginManagement {
    repositories {
		...
		// Import the GDSDK repository
        maven{
            url "https://repo.gdsre.cn/bale/repo"
        }
    }
}

dependencyResolutionManagement {
    repositories {
		...
		// Import the GDSDK repository
        maven{
            url "https://repo.gdsre.cn/bale/repo"
        }
    }

}- Add the GDSDK dependency (this step requires an outbound IP address; our Android integration team will configure the whitelist). Get the IP address at: https://www.ip125.com/
- Add the dependency in the game's main project build.gradle file:
xml
dependencies {
	...
	// This is an example. See the readme file delivered with the SDK for the specific dependency address.
    implementation 'com.gd:gdsdk-xxx:x.x.x'
	...
}
* If you receive a “403” code, your IP is not on the whitelist.
step3 Disable the APK Language Option
Use the android.bundle block in the game's main project build.gradle file and add language.enableSplit=false so that language files are not distributed separately when configuring the APK:
xml
android {
    bundle {
        language {
            enableSplit = false
        }
        density {
            ...
        }
        abi {
           ...
        }
    }
}