SDK 가져오기
Android Studio를 사용하여 SDK 통합
파일 추가
- 1.SDK의
google-services.json을 게임 메인 프로젝트의 루트 디렉토리에 배치합니다. 아래 그림과 같이: 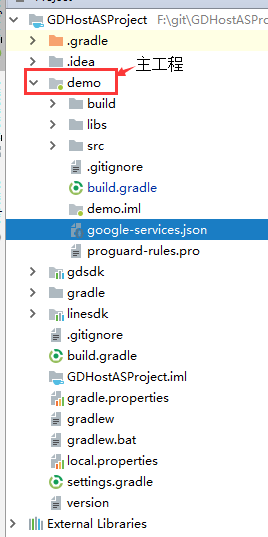
- 2.SDK의 gdconfig.xml 파일을 게임 메인 프로젝트의 res/values 디렉토리에 배치합니다. gdconfig.xml 구성 내용 해석은 게임 관련 정보 구성을 참조하십시오.
step1 Google 서비스 추가
- 1, Java 1.8 지원 활성화
xml
android {
...
  compileOptions {
        sourceCompatibility JavaVersion.VERSION_1_8
        targetCompatibility JavaVersion.VERSION_1_8
    }
...
}- 2, Google 서비스 가져오기 및 활성화
- 루트 수준 build.gradle에서 Google 서비스 가져오기
xml
buildscript {
    ...
    dependencies {
		classpath 'com.google.gms:google-services:4.4.4'
    }
	...
}- 3, 게임 메인 프로젝트 build.gradle 파일의 맨 아래에서 Google 서비스 활성화
xml
apply plugin: 'com.google.gms.google-services'step2 GDSDK 종속 라이브러리 추가
- 1, settings.gradle에서 GDSDK 리포지토리 가져오기
xml
pluginManagement {
    repositories {
		...
		// GDSDK 리포지토리 가져오기
        maven{
            url "https://repo.gdsre.cn/bale/repo"
        }
    }
}

dependencyResolutionManagement {
    repositories {
		...
		// GDSDK 리포지토리 가져오기
        maven{
            url "https://repo.gdsre.cn/bale/repo"
        }
    }

}- 2, GDSDK 종속 라이브러리 추가**(이 단계에서는 외부 IP를 제공해야 하며, 당사 Android 연동 기술팀에서 화이트리스트를 구성합니다)**IP 주소 획득: https://www.ip125.com/게임 메인 프로젝트 build.gradle 파일에 종속 라이브러리 추가:
xml
dependencies {
	...
	// 이곳은 예시입니다. 구체적인 종속 주소는 제공된 SDK의 readme 파일을 확인하십시오
    implementation 'com.gd:gdsdk-xxx:x.x.x'
	...
}
step3 APK 구성 언어 옵션 비활성화
게임 메인 프로젝트 build.gradle에서 android.bundle 블록을 사용하여 language.enableSplit=false를 추가하여 APK 구성 시 언어 파일을 분리하지 않도록 합니다:
xml
android {
    bundle {
        language {
            enableSplit = false
        }
        density {
            ...
        }
        abi {
           ...
        }
    }
}